
Import
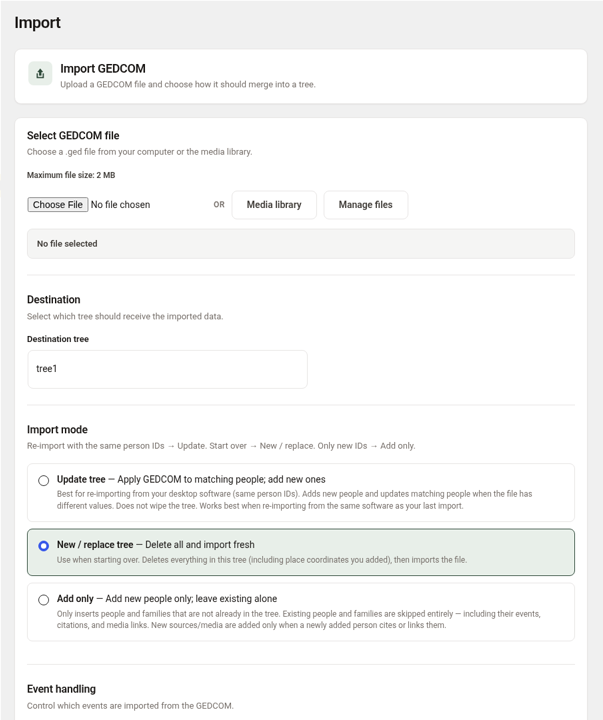
The Import screen brings a GEDCOM file into one of your trees. You will use it for your first import and every time you update your site with new research.
Open it from ForeBranch → Import.
Supported files
ForeBranch imports GEDCOM 5.5, 5.5.1, 5.5.5, and 7.0 files (.ged), exported from your genealogy software.
Import a GEDCOM
- Select GEDCOM file. Click Choose File to pick a .ged file from your computer, or Media library to choose one already uploaded. The screen shows your server’s Maximum file size.
- Destination. Choose the tree that should receive the data in Destination tree.
- Import mode. Choose Update, New / replace, or Add only (see below).
- Event handling. Leave both boxes checked unless you have a reason not to:
- Import custom event types – specialized events from your genealogy software.
- Import all events (standard and custom) – all event data.
- Optionally click Show advanced options to adjust performance.
- Work through the Before proceeding checklist: back up your database, confirm the destination tree, and review the import mode and event options.
- Click Continue and follow the remaining steps on screen.
Choosing an import mode
A quick rule: re-importing with the same person IDs → Update. Starting over → New / replace. Only adding new IDs → Add only.
| Mode | What it does | Best for |
|---|---|---|
| Update tree | Applies the GEDCOM to matching people and adds new ones. Updates matching people when the file has different values. Does not wipe the tree. | Re-importing from your desktop software with the same person IDs. Works best when you use the same software as your last import. |
| New / replace tree (default) | Deletes everything in the tree, including place coordinates you added, then imports the file. | A first import, or starting over. |
| Add only | Inserts only people and families not already in the tree. Existing people and families are skipped entirely, including their events, citations, and media links. New sources and media are added only when a newly added person cites or links them. | Adding new people while leaving everyone else untouched. |
Watch out: New / replace tree is selected by default. When updating an existing tree, switch to Update tree so you keep your place coordinates and other work.
Advanced options: performance
ForeBranch processes your file in chunks so large imports can finish on ordinary hosting.
- Processing chunk size – the most lines processed at once:
- 500 lines (shared hosting) – the default.
- 1,500 lines (conservative)
- 3,000 lines (balanced)
- Smart import optimization – on by default. Starts at 500 lines and increases up to the chunk size you chose when each step finishes quickly.
If an import times out, go back to 500 lines. For more help, see Server Settings for Large Imports.
After importing
- Check the counts on the Dashboard Overview.
- Use Diagnostics → GEDCOM Comparison to compare the file with what was imported.
- Review living and private flags on ForeBranch → Individuals.
- With Pro, upload and match media, merge duplicate places, and geocode.
Shortcut from the Trees screen
On ForeBranch → Trees, each tree’s Import link opens this screen with that tree already chosen as the destination.