
Media (Pro)
The Media screen (Pro) is where you upload photos and documents, match them to the media records in your GEDCOM, organize them into categories, and link them to people.
Open it from ForeBranch → Media. It has five tabs: Browse, Add, Bulk Upload, Attach files, and Categories.
How media gets into ForeBranch
A GEDCOM file records each media item’s title, file name, and which people it belongs to, but not the image files themselves. After you import, ForeBranch knows about your media; you then upload the actual files and match them up.
- Import your GEDCOM. This creates the media records and person links.
- Upload the photo files with Bulk Upload (or add them to the WordPress Media Library).
- On Attach files, click Match library to GEDCOM to connect the files to the records.
- Click Auto-Categorize on the Browse tab to sort them into categories.
Browse
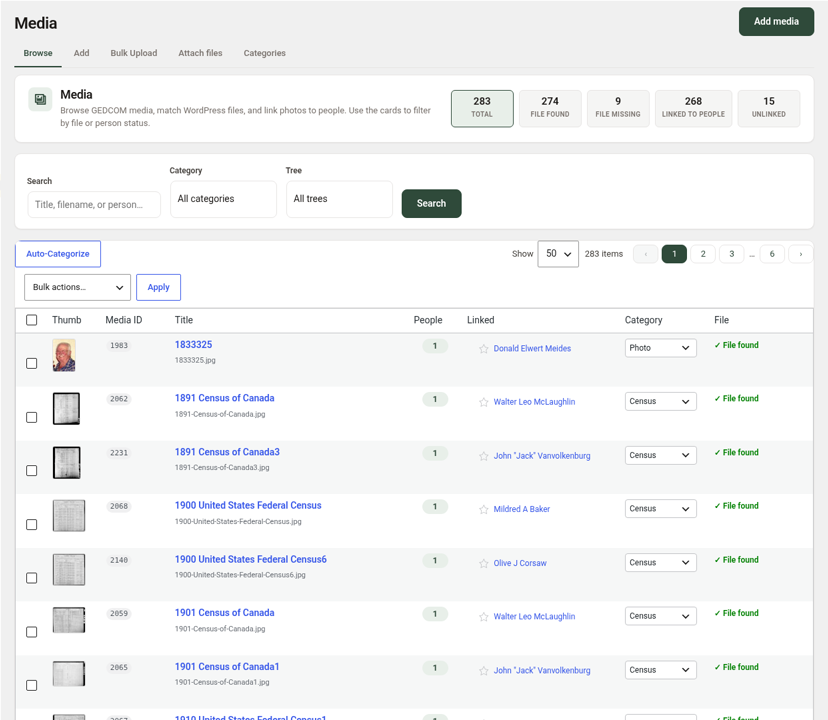
The tiles filter the list:
- Total – all media records.
- File Found and File Missing – whether the actual file is on your site.
- Linked to People and Unlinked
Use Search, Category, and Tree to narrow the list. The table shows a thumbnail, Media ID, Title (with Edit | View links), People count, Linked people, Category, and File status.
- Change a category directly in the Category drop-down, or choose + New Category.
- In the Linked column, click Set as primary photo for this person to make the image that person’s profile photo.
- Use Bulk actions… to delete selected items or set their category, then click Apply.
Add a single item
- Click Add media or open the Add tab.
- Choose the Family Tree.
- Click Choose File and select a photo or document from your computer.
- Fill in the details: Title, Description, Category, Date Taken (can be approximate, such as 1950 or Jan 1950), and Place Taken.
- Under Who is in this photo?, start typing a name and click each person to link them.
- Click Add Media.
Bulk upload
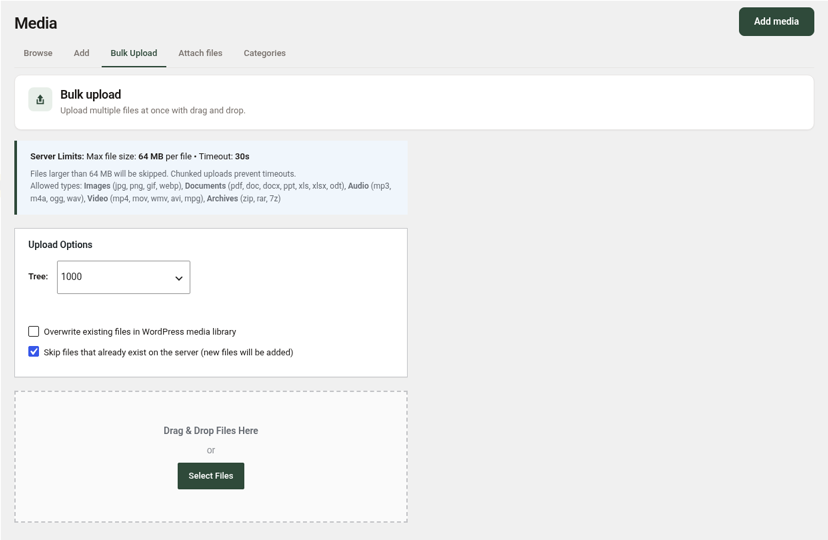
- Open the Bulk Upload tab.
- Choose the Tree.
- Set the options:
- Overwrite existing files in WordPress media library – off by default.
- Skip files that already exist on the server – on by default; new files are still added.
- Drag files onto Drag & Drop Files Here, or click Select Files.
The box at the top shows your server’s per-file size limit; larger files are skipped. Uploads are sent in chunks to prevent time-outs. Allowed types:
- Images: jpg, png, gif, webp
- Documents: pdf, doc, docx, ppt, xls, xlsx, odt
- Audio: mp3, m4a, ogg, wav
- Video: mp4, mov, wmv, avi, mpg
- Archives: zip, rar, 7z
Attach files to GEDCOM media
This tool matches uploaded files (or files already in the WordPress Media Library) to the media records from your import, so the person links from your GEDCOM are kept.
- Open the Attach files tab.
- Choose the Tree.
- Click Match library to GEDCOM. This attaches files and cleans up unlinked duplicates.
- Check Still missing a WordPress file. It lists the filename, title, media ID, and linked people for records without a file. Upload those filenames, then run the match again.
Categories
ForeBranch includes built-in categories: Baptism, Birth, Burial, Census, Death, Directory, Divorce, Education, Immigration, Land, Marriage, Military, Newspaper, Occupation, Photo, Probate, and Uncategorized. Each has keywords used by Auto-Categorize; for example, Census uses words such as “census” and “enumeration”.
Add your own category
- Open the Categories tab.
- Enter a Category name.
- Enter Keywords (comma-separated), for example “newspaper, article, clipping”.
- Click Add Category.
Use Edit Keywords to fine-tune any category, including the built-in ones.
Auto-categorize
On the Browse tab, click Auto-Categorize. ForeBranch uses each category’s keywords to sort your media.
Edit a media item
- On Browse, click Edit under the item’s title.
- Use Rotate Left or Rotate Right to fix orientation, Change Photo to pick a different file from your Media Library, or Remove Image.
- Update the Title, Description, Category, Date Taken, and Place Taken.
- Under Who is in this photo?, click Edit People in Photo to add or remove people.
- Under Primary photo, tick each linked person who should use this image as their profile photo.
- Click Save Changes.
Where media appears
Linked media appears on the person’s Media tab, grouped by category, such as Photos, Birth Records, Marriage Records, and Census Records. Visitors click a thumbnail to open it in a viewer.