
Individuals
The Individuals screen lets you review everyone imported from your GEDCOM and control who appears on your public site.
Open it from ForeBranch → Individuals. Names, dates, and relationships come from your GEDCOM: change those in your genealogy software and re-import. Here you control site visibility, delete records, and manage biographies (Pro).
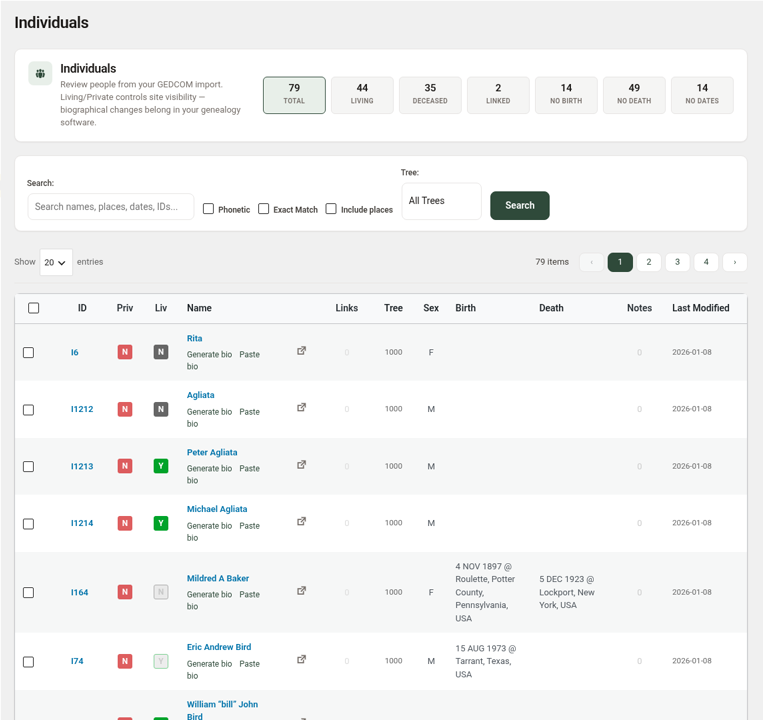
Filter tiles
Click a tile to filter the list:
- Total – everyone.
- Living and Deceased – based on ForeBranch’s living rules and your flags.
- Linked
- No Birth, No Death, and No Dates – people missing those dates.
Search for people
- Type in the Search box. You can search names, places, dates, and IDs.
- Optionally tick Phonetic (sound-alike names), Exact Match, or Include places.
- Choose a tree from Tree, or leave it on All Trees.
- Click Search.
Use Show 10/20/50/100 entries to change how many people appear per page (20 by default).
The list columns
| Column | What it shows |
|---|---|
| ID | The person ID. Click it for a quick Person Details pop-up. |
| Priv | Private flag (N or Y). Click to toggle. |
| Liv | Living flag (N or Y). Click to toggle. |
| Name | Click to open the person’s read-only View screen. Biography actions appear underneath (Pro). |
| View on site icon | Opens the public person page. |
| Links | Number of linked media items. |
| Tree, Sex, Birth, Death | Basic details. |
| Notes | Number of notes. Click to open the Person Notes pop-up. |
| Last Modified | When the record last changed. |
Click the ID, Name, Tree, Sex, Birth, Death, or Last Modified heading to sort.
Hide a person from the public
Marking someone private hides their details from visitors, who see “Private” instead. Administrators still see them.
- Find the person in the list.
- Click the N in the Priv column (“Public (click to make private)”). It changes to Y.
To change several people at once, tick their boxes, choose Mark Private or Unmark Private from Bulk Actions, and click Apply.
Mark someone as living
ForeBranch decides who is living automatically (see Configuration Settings). To override it for one person, click the value in the Liv column (“Not living (click to mark living)”). Living people are hidden from everyone except Administrators.
View a person’s details
- Click the person’s Name.
- The View screen shows the Person ID, Tree, Name, Sex, Birth, Death, Burial, Site visibility (Private and Living flags), and a View on site link.
- Below that, Parents and Children / spouses list their families, with links to each family.
This screen is read-only. Change names, dates, or relationships in your genealogy software, then re-import.
Add a biography (Pro)
Under each name are two biography actions:
- Generate bio – creates a biography with your chosen AI provider. It appears only when Enable AI biography generation is on.
- Paste bio – add a biography you wrote yourself.
Published biographies appear on the person’s Biography tab. See AI Biographies.
Delete people
- One person: open their View screen and click Delete person record.
- Several people: tick their boxes, choose Delete Selected from Bulk Actions, and click Apply.
Deleting a record here does not change your genealogy software, so a later re-import with Update tree or Add only adds the person back. To keep someone off your public pages, mark them private instead.
Export a list
Tick the people you want, choose Export Selected (CSV) from Bulk Actions, and click Apply.