How can we help?
Trees
A tree is the container that holds one imported GEDCOM. You can have as many trees as you like, for different branches of the family or separate research projects.
Open the Trees screen from ForeBranch → Trees. It has Browse and Add tabs, and an Edit tab appears when you open a tree.
Browse your trees
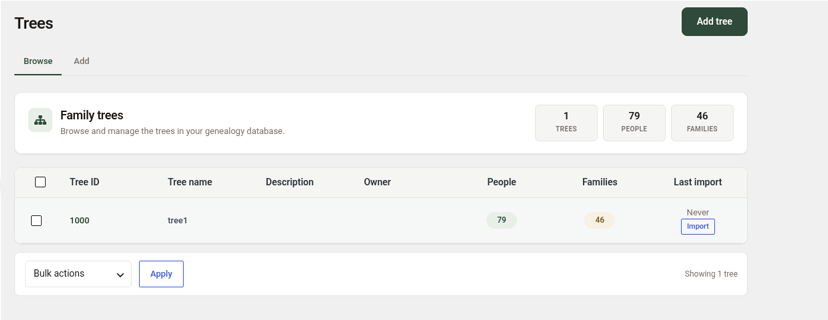
The Browse tab shows totals for trees, people, and families, then a table with these columns:
- Tree ID – click it to open the tree’s Edit tab.
- Tree name and Description
- Owner
- People and Families – how many records the tree holds.
- Last import
Each row also has an Import link that opens the Import screen with that tree already selected.
Add a tree
- Go to ForeBranch → Trees and click Add tree (or the Add tab).
- Under Tree details, enter:
- Tree ID (required) – a unique ID using letters, numbers, and underscores. It cannot be changed later.
- Tree name (required) – the display name for this family tree.
- Description – optional notes about this tree.
- Under Owner contact, optionally enter the owner name, email, phone, and address.
- Click Create tree.
Your new tree is ready to receive a GEDCOM. Click its Import link on the Browse tab to fill it.
Edit a tree
- On the Browse tab, click the tree’s Tree ID.
- Review the tiles showing the tree’s people, families, events, sources, media, and notes.
- Update the name, description, or owner contact details. The Tree ID is read-only.
- Click Save changes, or Cancel to leave without saving. Use Back to browse to return to the list.
Danger zone: clear or delete a tree
These actions are permanent and cannot be undone. Back up your database first.
- Clear tree data – removes the genealogy data held in the tree.
- Delete entire tree – removes the tree and all of its data.
- Open the tree’s Edit tab.
- Scroll to Danger zone.
- Click Clear tree data or Delete entire tree and confirm.
Work with several trees at once
- On the Browse tab, tick the boxes beside the trees you want (or use Select all trees).
- Choose Delete selected or Clear selected from Bulk actions.
- Click Apply.
Trees on your public site
- Every public list page has a Filter by Tree option so visitors can view all trees or just one.
- The hub for a single tree is at /genealogy/tree/<tree>/.
- Person page addresses include the Tree ID, for example /genealogy/surnames/person/I544/1000/.