
Importing Your First GEDCOM
This guide takes you from an empty site to a published family tree in a few minutes.
Before you start
- Export a GEDCOM from your genealogy software. ForeBranch reads GEDCOM 5.5, 5.5.1, 5.5.5, and 7.0.
- Check the file size. The Import screen shows your server’s limit (for example, “Maximum file size: 2 MB”). If your file is larger, see Server Settings for Large Imports first.
- Back up your database. This is a good habit before any import.
Step 1: Create a tree
A tree is the container your GEDCOM is imported into.
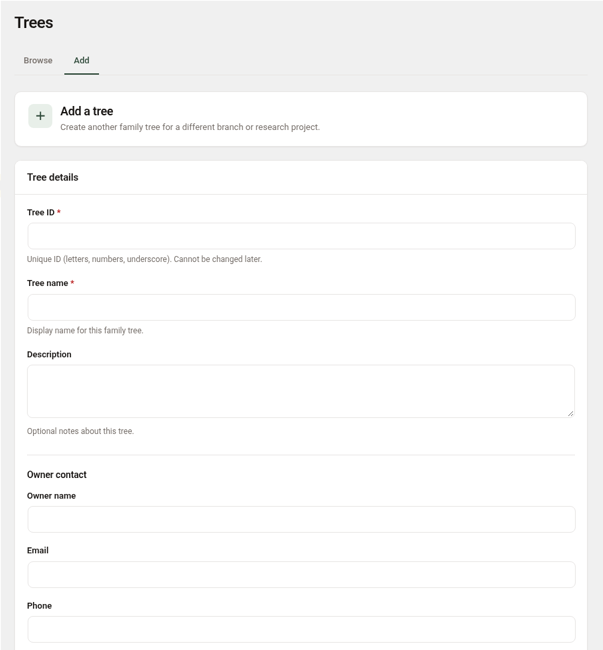
- Go to ForeBranch → Trees and click Add tree (or open the Add tab).
- Enter a Tree ID. Use letters, numbers, and underscores only. The Tree ID cannot be changed later.
- Enter a Tree name. This is the display name visitors see.
- Optionally add a Description and the owner’s contact details.
- Click Create tree.
Step 2: Import the file
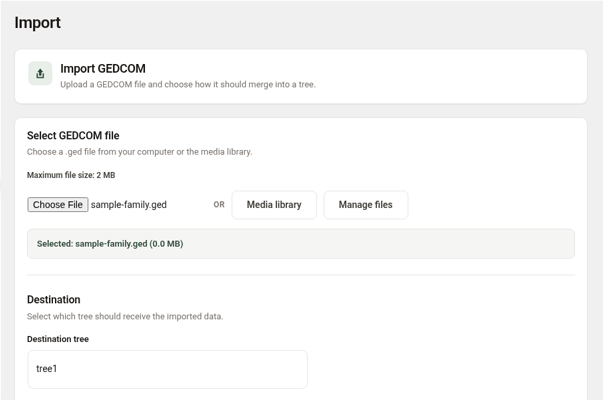
- Go to ForeBranch → Import.
- Under Select GEDCOM file, click Choose File and pick your .ged file, or click Media library to choose one you already uploaded.
- Under Destination, choose the tree you just created.
- Under Import mode, leave New / replace tree selected for a first import into an empty tree.
- Under Event handling, leave both boxes checked (Import custom event types and Import all events) so all your events come across.
- Read the Before proceeding checklist, then click Continue and follow the remaining steps on screen.
ForeBranch processes the file in chunks so it can handle large trees on ordinary hosting. If you run into time-outs, see Import in the Admin Guide for the advanced performance options.
Step 3: Check the results
- Open ForeBranch → Dashboard. The Overview tiles show how many trees, individuals, families, media references, places, and sources you now have.
- Open ForeBranch → Individuals to browse the people you imported.
- For an exact check, go to ForeBranch → Dashboard → Diagnostics and use GEDCOM Comparison to compare the file with what is in the database.
Step 4: Review privacy
ForeBranch automatically hides living people from everyone except Administrators. Take a minute to confirm it is treating people the way you expect.
- On ForeBranch → Individuals, click the LIVING tile to see who is treated as living.
- Use the Priv and Liv toggles in the list to adjust individual people.
- To change the rules, go to ForeBranch → Dashboard → Configuration → Privacy Settings.
Step 5: Follow the post-import suggestions
The Dashboard’s Post Import Suggestions section lists helpful next steps:
- Add place coordinates for places without latitude/longitude.
- Add genealogy to your menu by linking the genealogy hub from Appearance → Menus.
- Review individuals to check living and private flags.
- With Pro: Bulk Upload Media, Autocategorize Media, Merge Duplicates (places), and Geocode, in that order.
Step 6: Visit your site
Open yoursite.com/genealogy/, or click View frontend under Quick actions on the Dashboard. You will see your genealogy hub with links to surnames, families, sources, and places.
Updating your tree later
When you make changes in your genealogy software, export a new GEDCOM and import it into the same tree using Update tree. This adds new people and updates matching people without wiping the tree. See Import for a full comparison of the three import modes.